Frank Cluster Instructions
Getting Started with the Frank Cluster
This guide covers onboarding, accessing login/compute nodes, SSH key setup, optional container/Redis usage, and CI/CD configuration for mirroring GitHub repositories to gitlab.spack.io and running pipelines on Frank-hosted runners.
Step 1 — Fill out University of Oregon’s onboarding form
Fill out the following form:
- https://systems.nic.uoregon.edu/account/
If you run into issues, please contact a staff member:
- Erik Keever — ekeever1@uoregon.edu
- Luke Peyralans — lpeyrala@uoregon.edu
Step 2 — Accessing Frank login & compute nodes
1.- SSH into one of the login nodes. As of today, the available login nodes are:
| Login Node | SSH Command |
|---|---|
| Orthus | ssh orthus.nic.uoregon.edu |
| Sphinx | ssh sphinx.nic.uoregon.edu |
2.- Now that you are ssh’ed into one of the login nodes, ssh into a compute node of your choice:
ssh gorgon
3.- Note: The list of login / compute nodes is subject to change. For the most current server list, please visit the following webpage: Server List. This list is useful because it provides details on the architectures and compute powers of the nodes.
Step 3 - Set up SSH keys
If you want to do repository work on the Frank compute clusters, you will need a ssh key. The standard setup is to create a hidden directory in your home (~/) called .ssh.
mkdir ~/.ssh
cd ~/.ssh
Once in your .ssh directory, generate a public and private key pair. There are a number of different commands you can use to do this, but it will look something like this:
ssh-keygen -t rsa -b 4096
When you run the above command, you will choose which file to save the keys to and what the passphrase is. If left blank, then the keys will be saved to id_rsa (for the private key) and id_rsa.pub (for the public key). Once you have those generated, navigate to your repository (ie, Github, Gitlab) settings and you should see a section about SSH keys. Click on Add new key or something similar, this is where you will place the contents of id_rsa.pub. Once done click Add key.
Containers on Frank
If you intend to use containers via Docker on Frank, reach out to one of the University of Oregon staff and request that they run their givedocker script to give you access. Docker is installed but this script needs to be run for users to have access.
If you would like to learn more about Docker containers in general, see their official docs: https://docs.docker.com/.
In addition, be sure to check out the official documentation for how to use E4S containers, which can be customized to suit your needs: https://e4s.io/use/.
Redis (Optional)
Redis remote storage is an in-memory data structure store that serves as a remote backend for persisting and managing data, enabling fast access and retrieval while supporting a variety of data types and structures. Redis is particularly effective for caching data, such as build data, to save time.
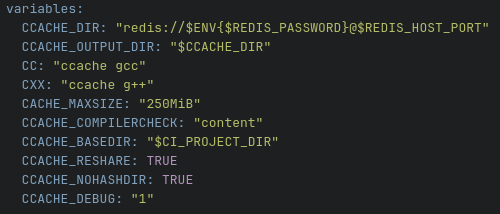
If you intend to make Redis part of your workflow then you will have to reach out to UO staff and they will provide you with a Redis host, port number, and password that you can use. Our suggestion is to store those as CI/CD variables in Gitlab.spack.io so that you can use them in your CI/CD jobs via the .gitlab-ci.yml file. See image below for an example.
Modules
The module system provides a convenient way to access pre-built and pre-installed binaries of software and toolchains that you need, eliminating the need for manual installation. The Frank team has provided a variety of modules for your use.
Accessing Modules from a Compute Node
List Available Modules
- To see the list of available modules, run the following command:
-
module avail
-

Load a module
- To load a specific module, use the command:
-
module load <module-name>
-
Once the module has been loaded, all relevant binaries and libraries will be placed on your current environment paths. For instance, if you loaded a version of Cmake, you could simply type cmake into the terminal and hit enter and the version of Cmake that you loaded will be used.
CI/CD
The Trilinos CI/CD pipeline mirrors the public Trilinos GitHub page onto gitlab.spack.io via the Spack CI Bridge python file. This requires a couple of different CI/CD variables to be set. The pipeline is triggered on gitlab.spack.io through a .gitlab-ci.yml file, utilizing runners hosted on Frank. In the next section we will discuss how to set up the CI/CD environment to match what we have had success with.
CI/CD Setup
To mirror a public GitHub repository to gitlab.spack.io, follow the steps below.
Gitlab.spack.io - Initial Setup
To obtain an account you will need to reach out to someone on the Kitware team, for instance, Zach Galbreath (zack.galbreath@kitware.com). They will send you an invitation to join. Follow the instructions provided to sign up and get logged in.
Additionally, you may want to create a group for yourself or your team, reach out to the Kitware team and indicate which group(s) you would like to be setup.
Once you are logged in, you will be able to create a repository or fork one. You can also mirror a repository if you have one handy (see https://docs.gitlab.com/user/project/repository/mirror/)
GitHub
You will need a valid GitHub account, if you do not have one, sign up here. https://github.com/. On that page, click on sign up in the upper right and follow the instructions provided
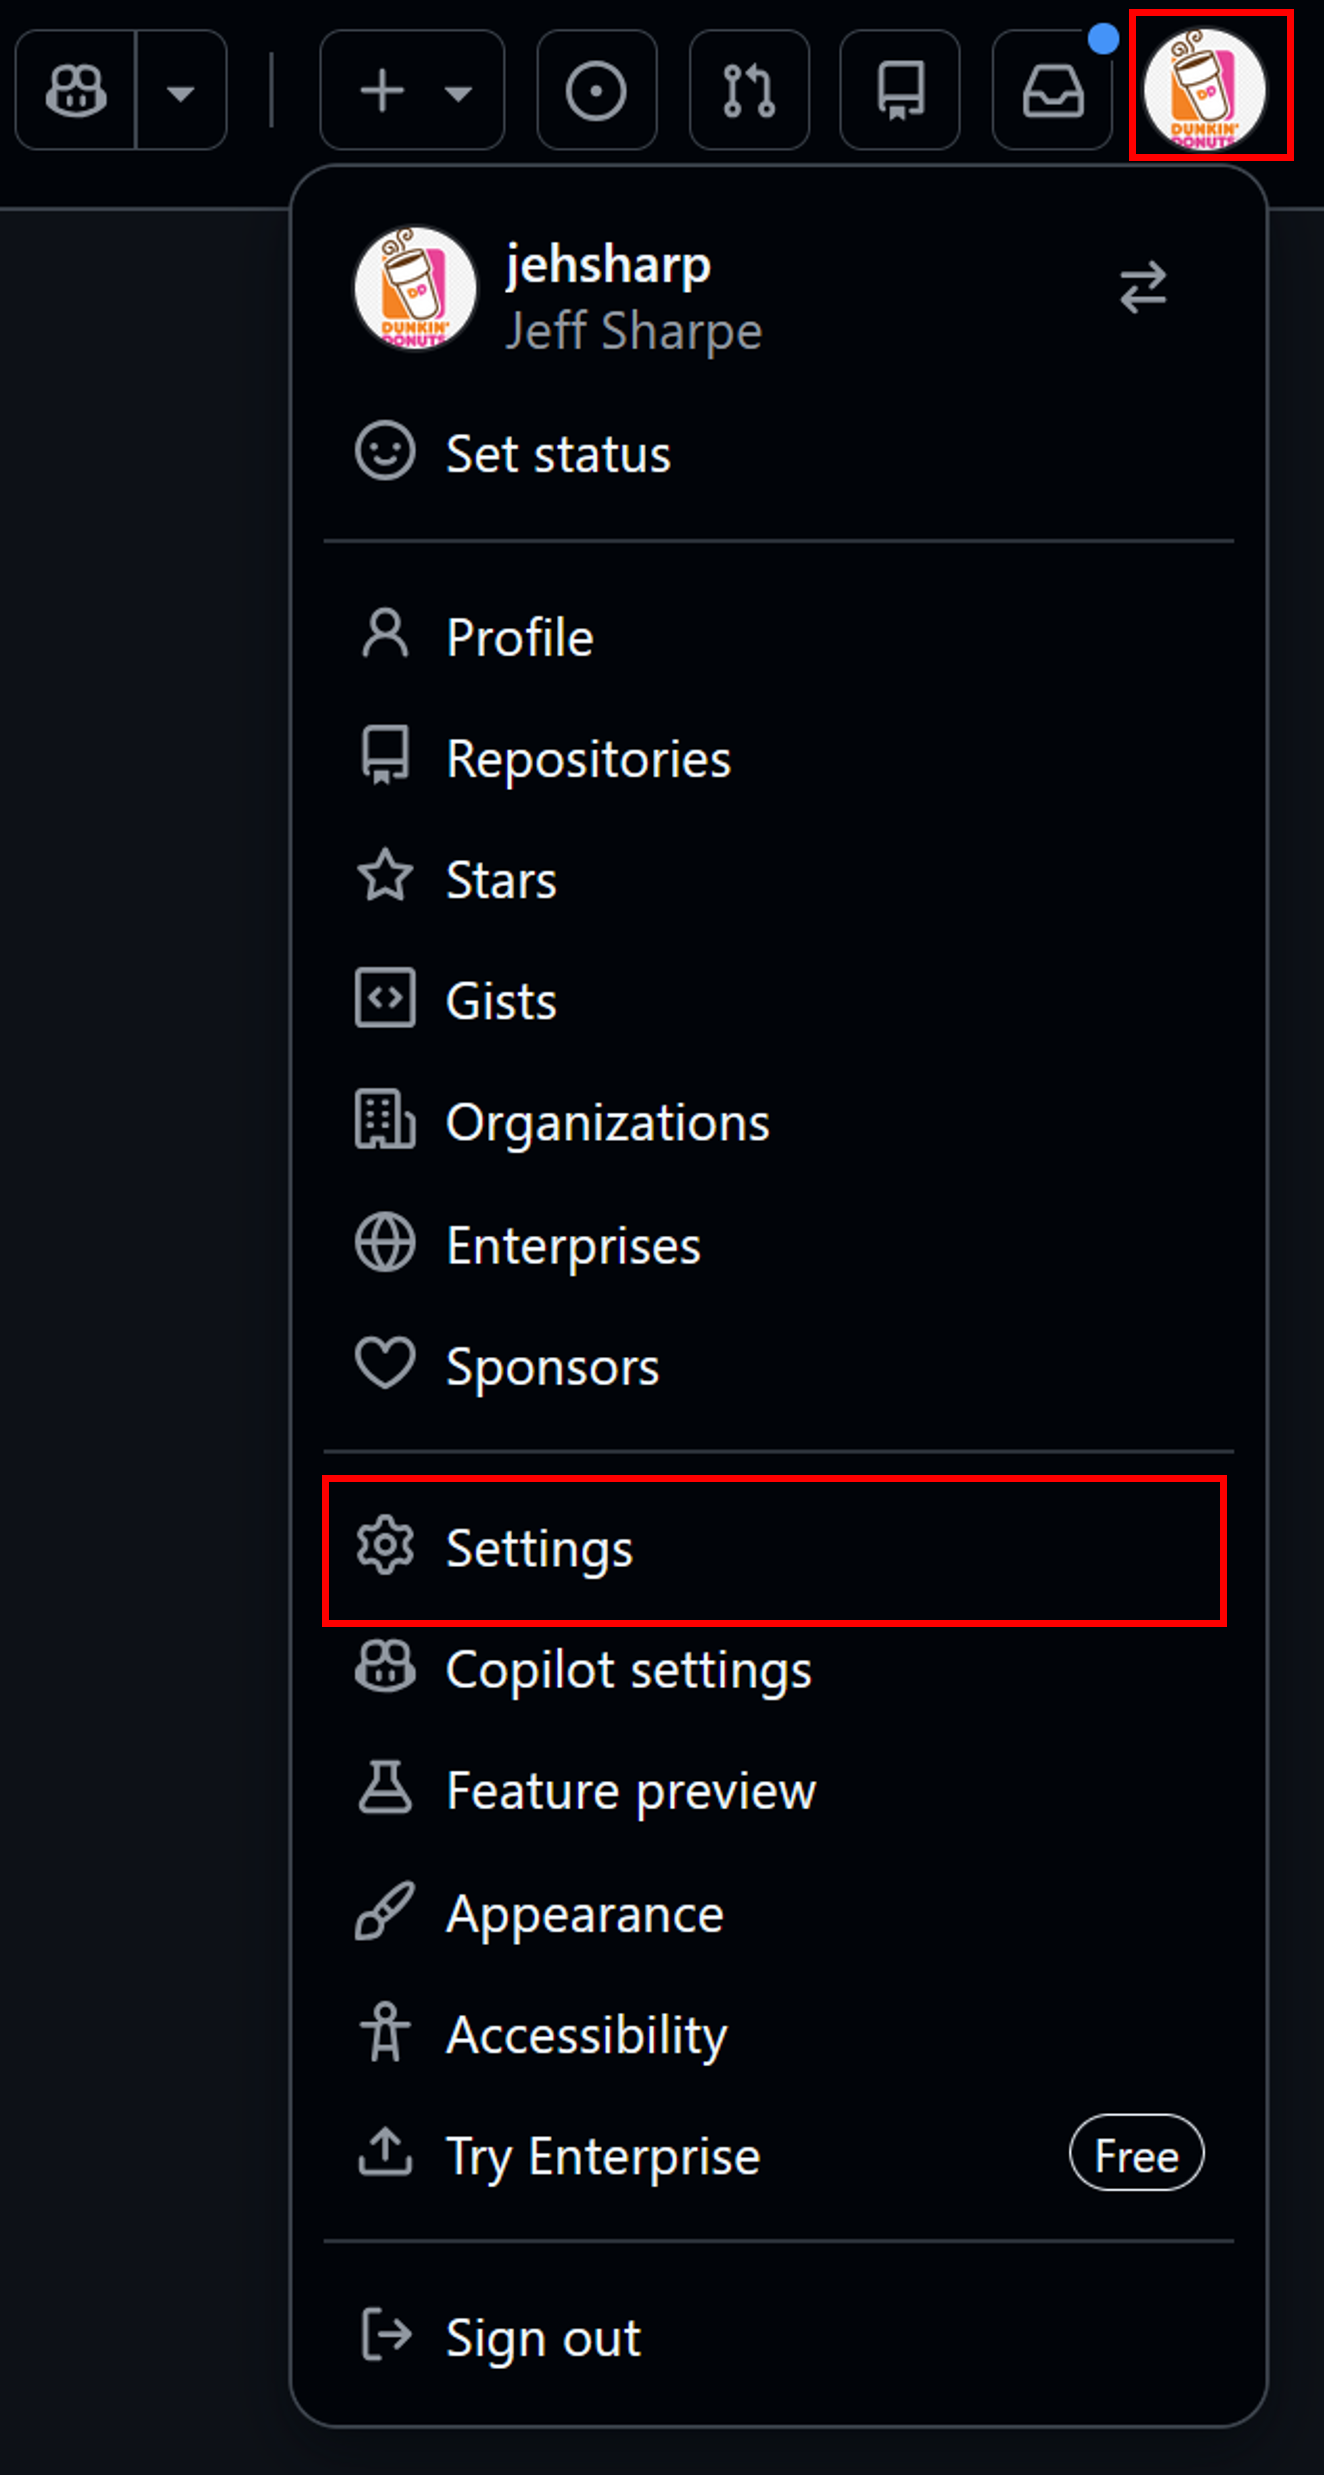
Once you have your GitHub account, you will need to create a GitHub personal access token to make use of the Spack CI Bridge python file used to mirror the GitHub repository to Gitlab. Click on your profile icon in the upper right corner and navigate to settings.
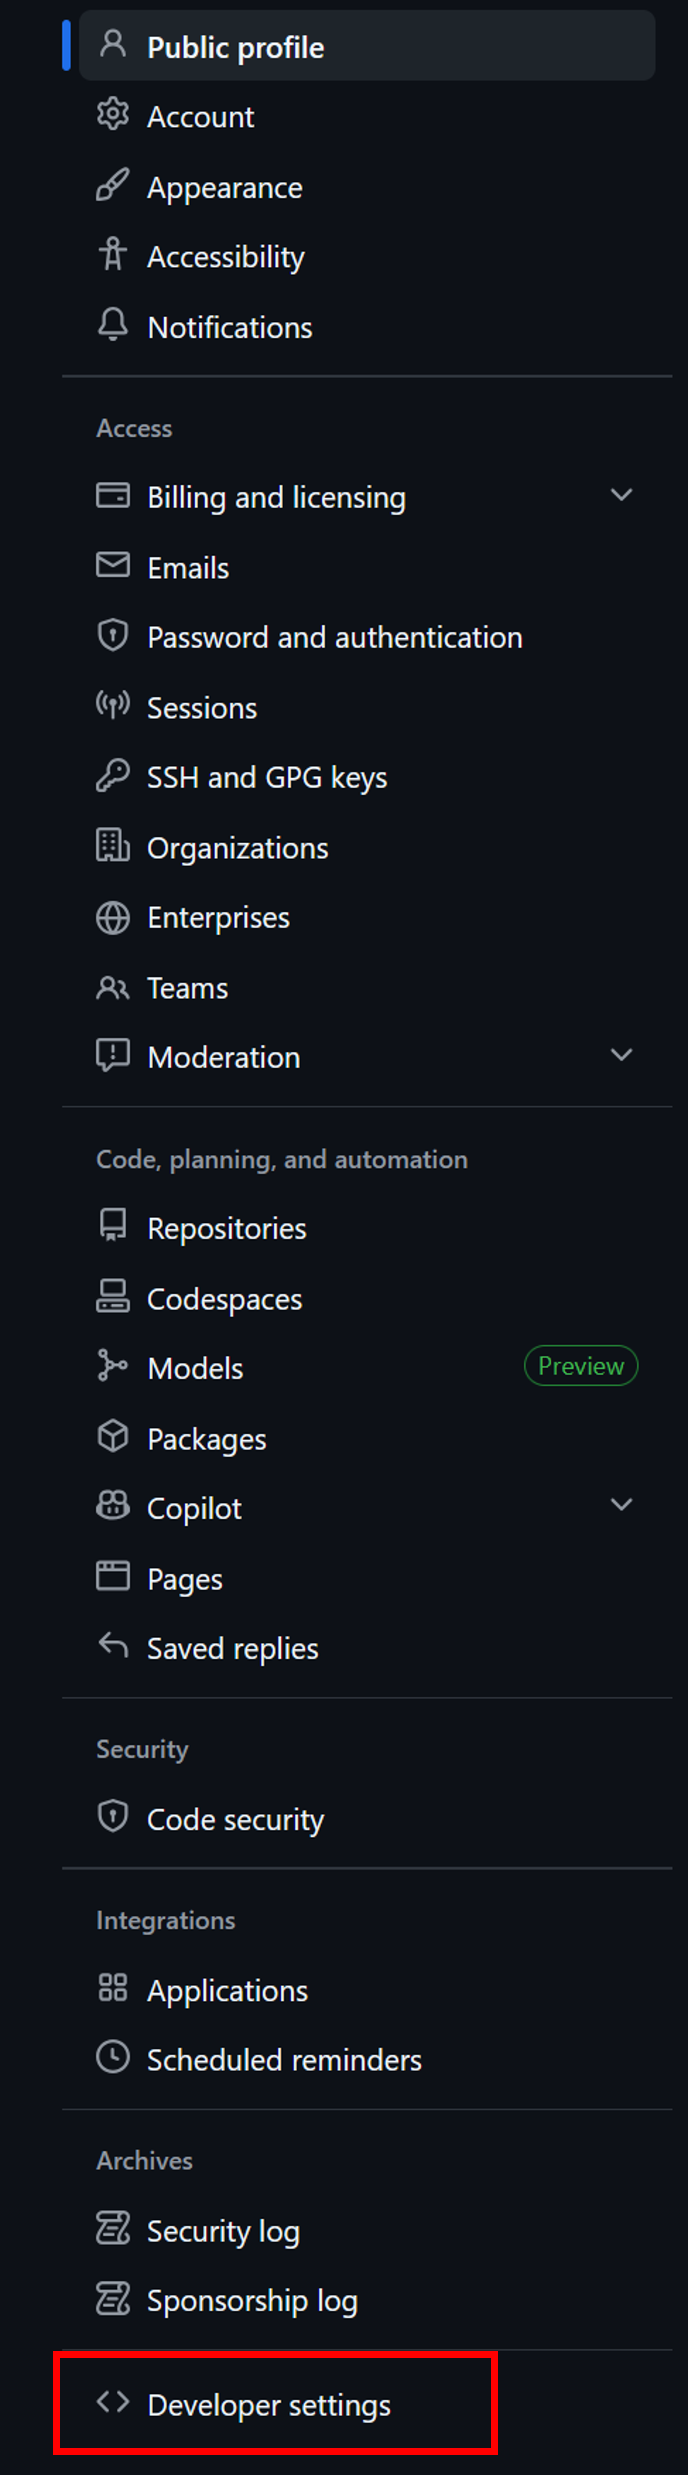
Once in settings, you will want to scroll down and click on Developer Settings.
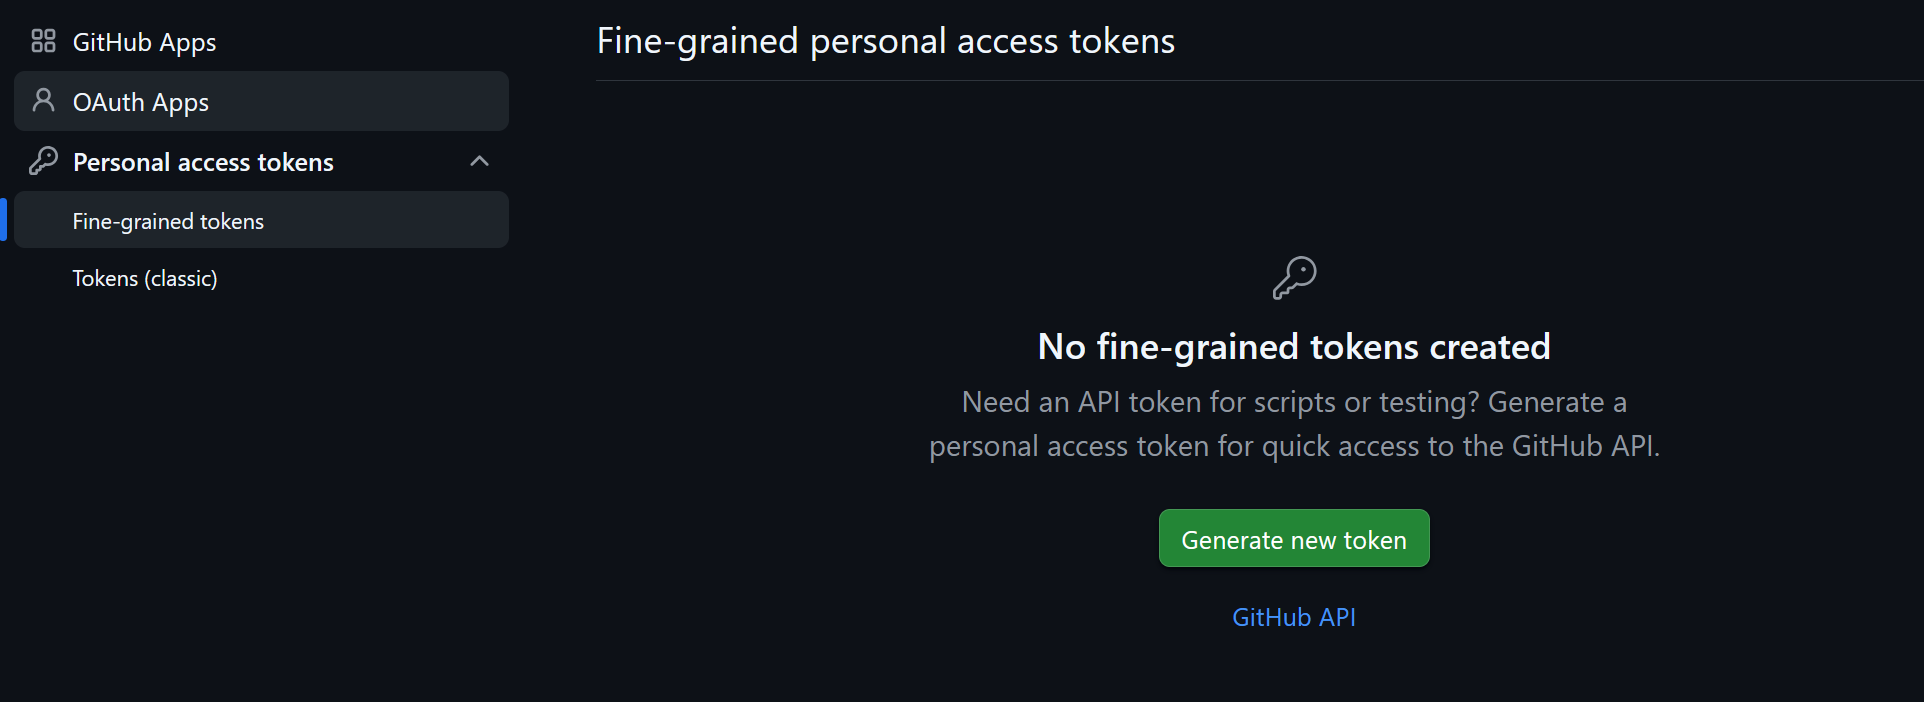
From there click on Personal access tokens. Click on Generate new token. Feel free to use either the classic or fine-grained tokens.
Fine-grained personal access tokens in GitHub provide more specific permissions and are limited to particular repositories and actions, while classic personal access tokens offer broader access across all repositories and actions associated with the account.
On the Generate new token page, fill in your token information, such as name, description, expiration date, etc. You will also need to grant the token any needed permissions for your project, for example repo and read:org. Check out the token permissions documentation. Once the token is generated, you will only be able to see it one time. So, make sure to copy it somewhere secure because we will use it again shortly.
Gitlab.spack.io - CI/CD Variable Setup
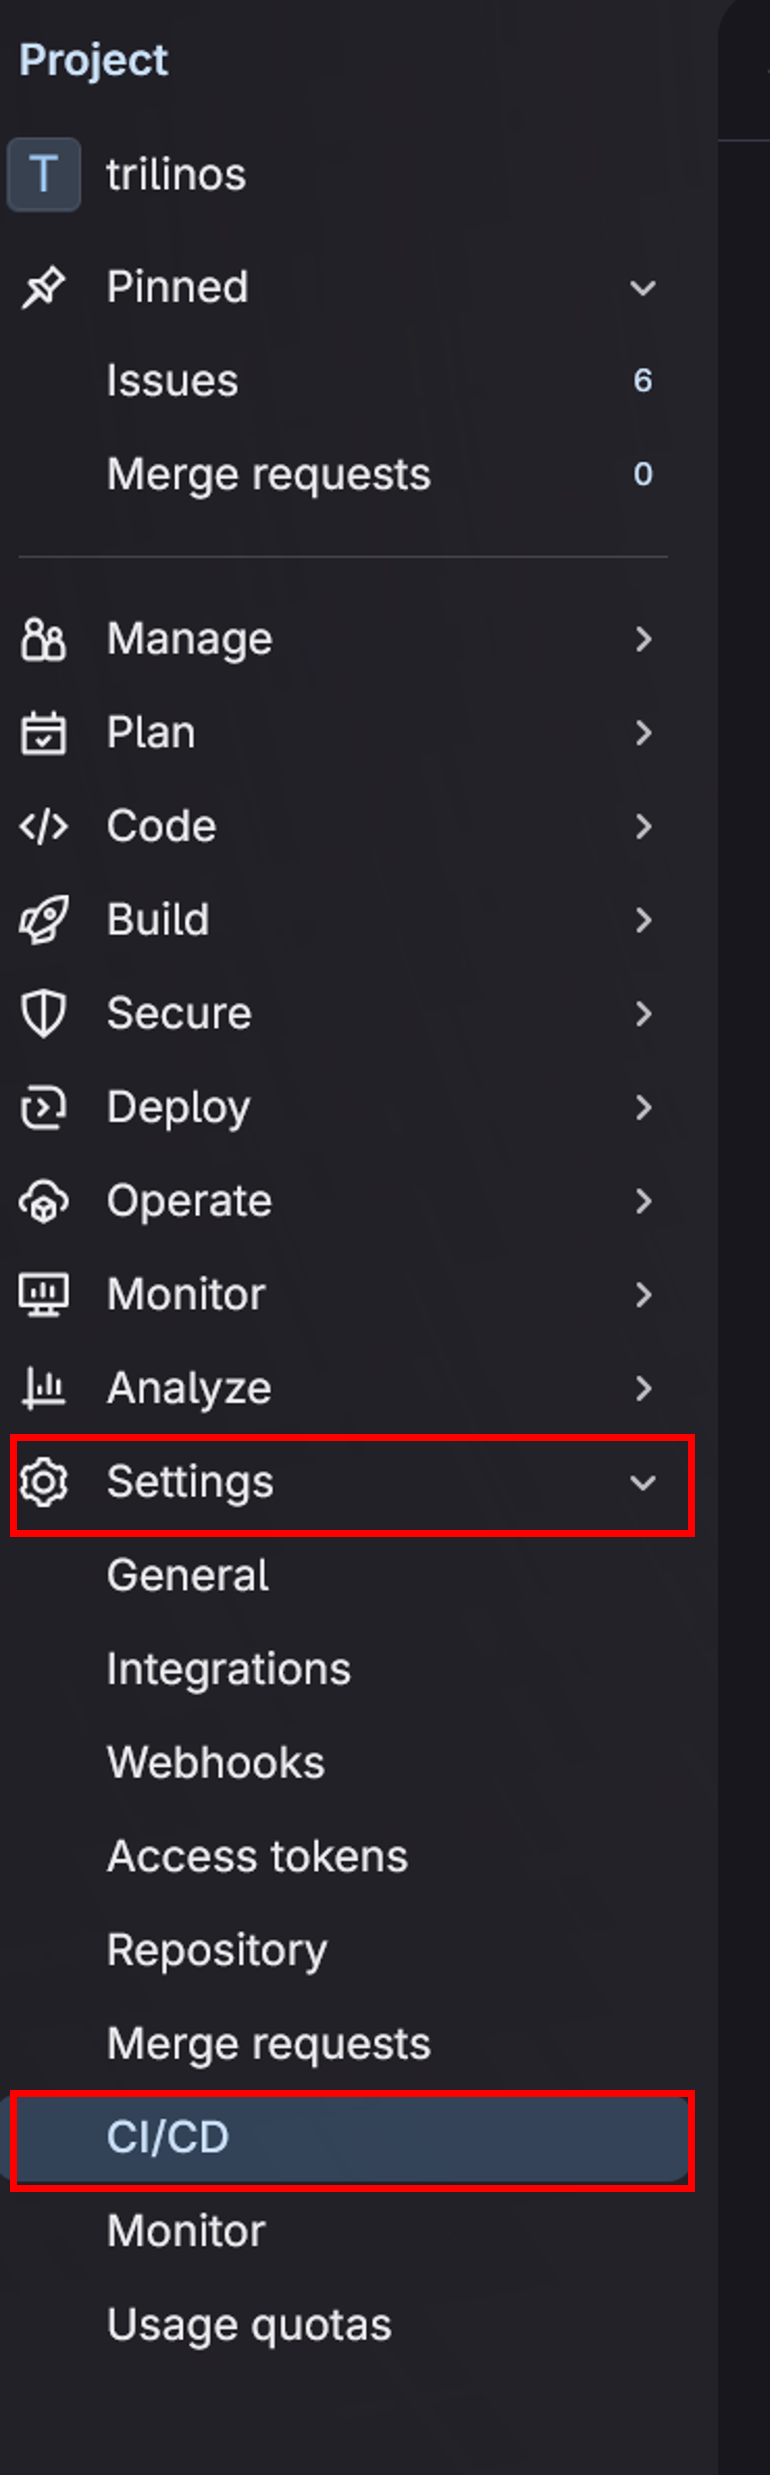
Next, we will set up this GitHub token in gitlab.spack.io in order to use the Spack ci bridge python script to mirror the GitHub repository to GitLab in the ci/cd job. Navigate to gitlab.spack.io and click on a project. Click on settings, then ci/cd.
This will open up the CI/CD settings page, find the variables section and expand it. Here is where you will add the GitHub token as a ci/cd variable.
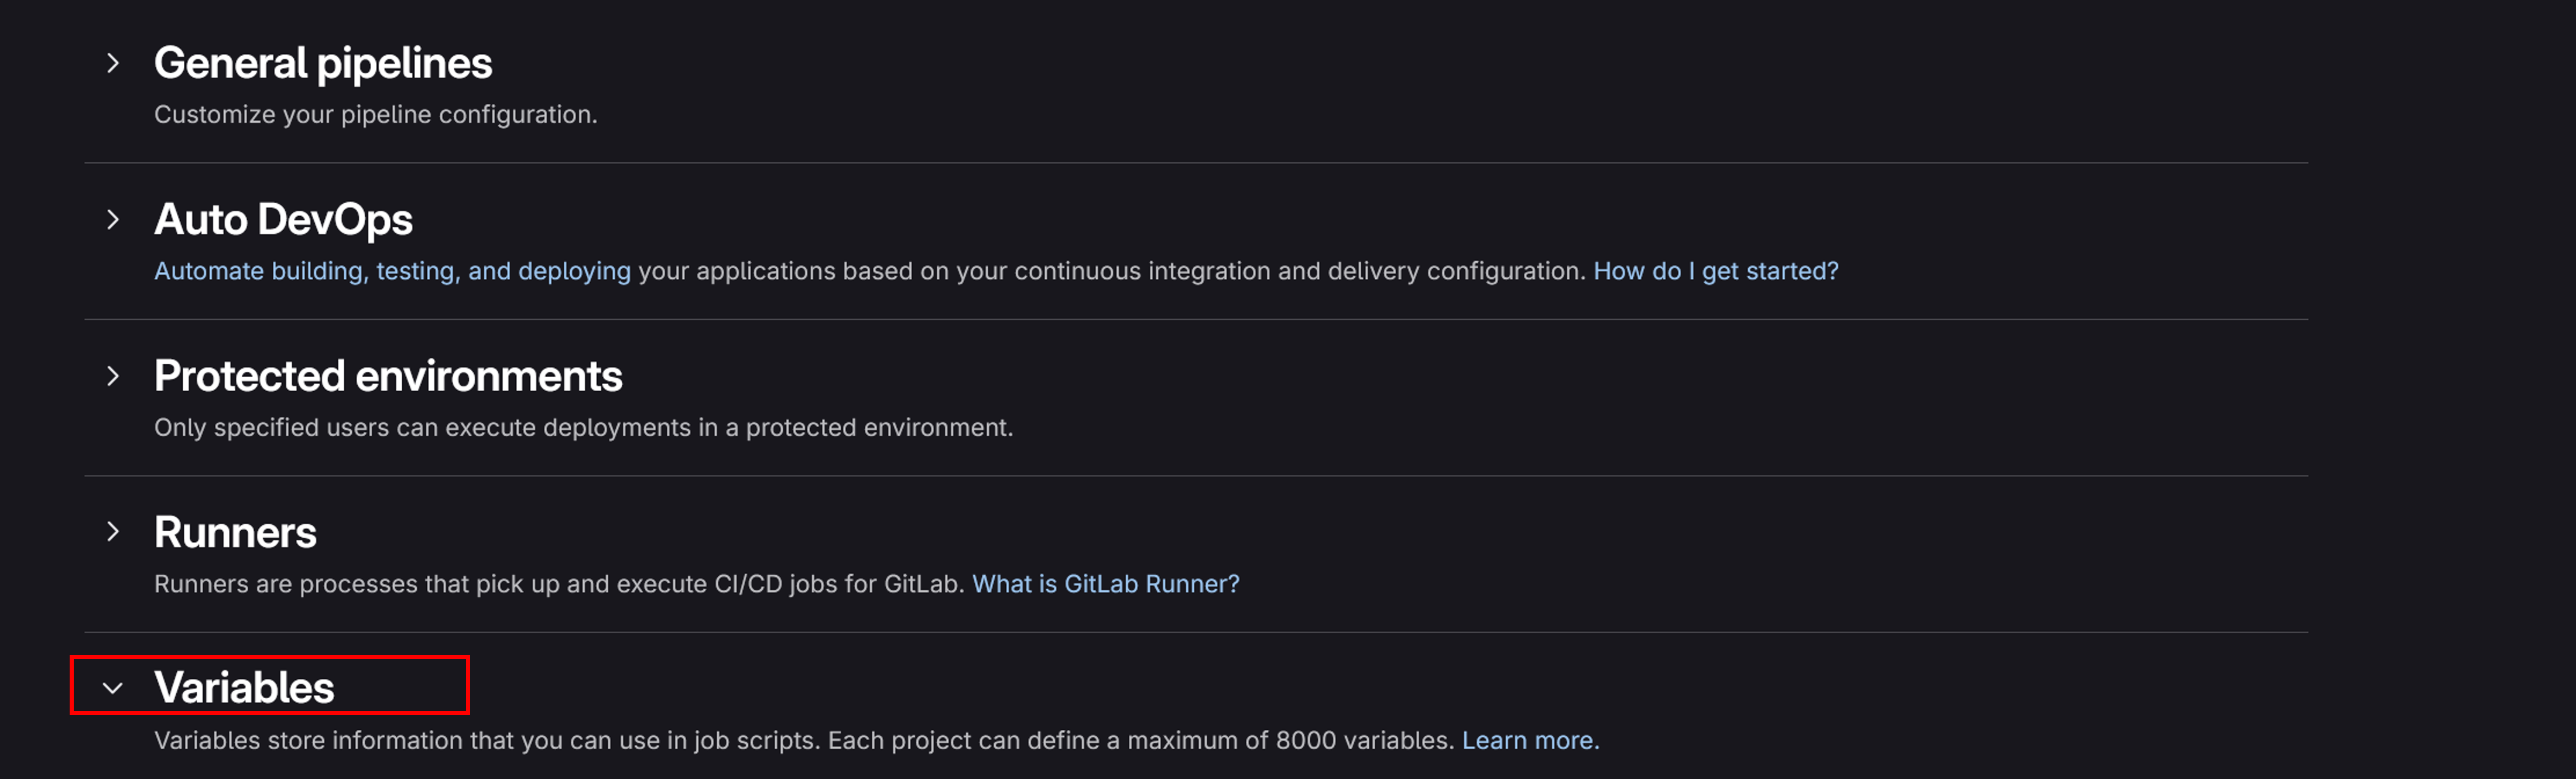
Now, under the project variables section, click on add variable.

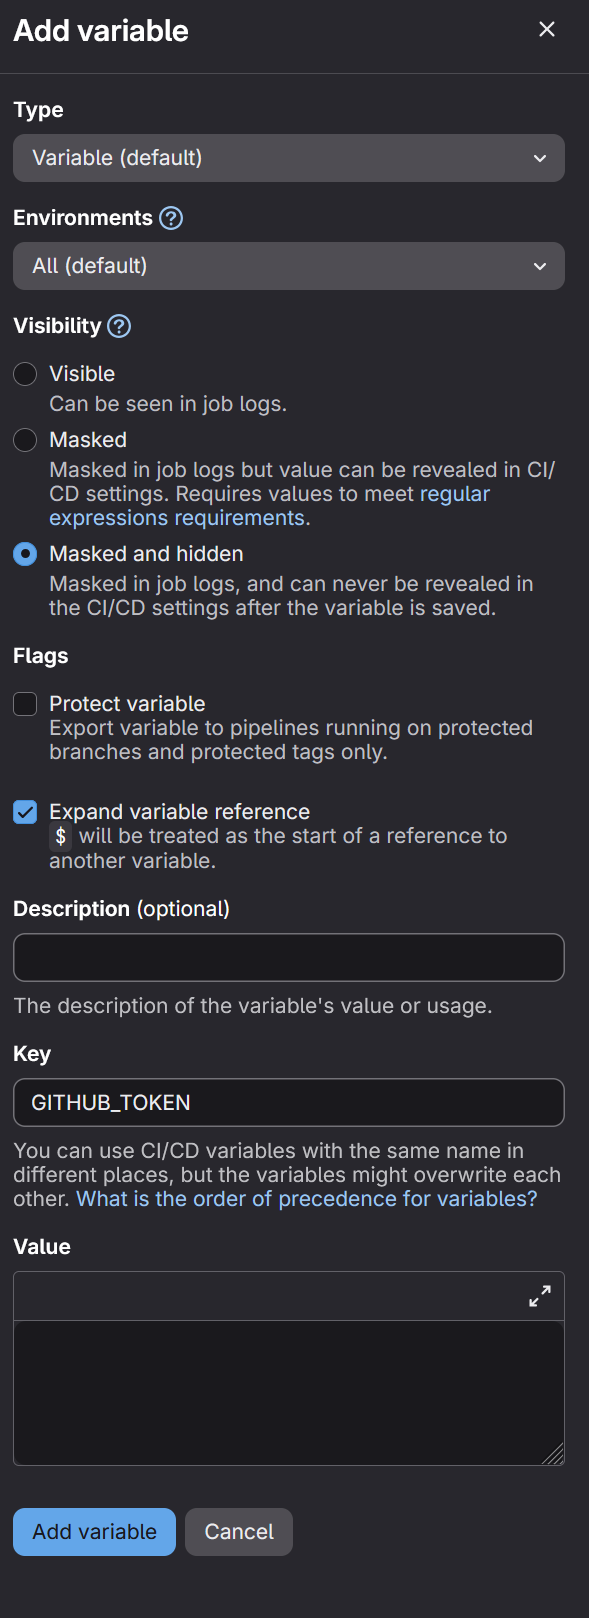
This will open up the below interface. For the Spack CI Bridge python script to work you will need to enter GITHUB_TOKEN in the Key textbox. Then input the GitHub token you generated in the Value section. It is recommended that you set visibility to Masked and hidden and set the flag to Expand variable reference. Once everything has been entered, hit add variable.
In addition to the GITHUB_TOKEN, you will need to follow the same process and create another CI/CD variable for your Gitlab SSH key. This must be in base64 and the Key must be GITLAB_SSH_KEY_BASE64. You can use the following terminal command to get your GitLab SSH key into base64.
base64 <path_to_ssh_key>/id_rsa
This will display your private key in base64. Copy and paste that into the value section. Note that this is the SSH key you set up earlier in step 3.
GitLab CI YAML Setup
The .gitlab-ci.yml file is a key component for automating the build, test, and deployment processes in GitLab. It acts like a recipe for GitLab’s CI/CD system, outlining a series of steps, or a “pipeline,” that runs whenever we make code changes. This file helps set up different environments, like for development, testing, and production, and specifies the commands needed for each. By using the .gitlab-ci.yml file, we streamline our workflow, ensuring our code is consistently tested and deployed correctly, which saves time and reduces errors. See the official documentation here: https://docs.gitlab.com/ci/yaml/.
Example Sync Job
In your .gitlab-ci.yml file, you can include a stage like the following to perform the mirroring sync with the Spack CI Bridge python script.
sync:
 stage: sync
 variables:
 GIT_STRATEGY: none
 GITHUB_TOKEN: $GITHUB_TOKEN
 GITLAB_SSH_KEY_BASE64: $GITLAB_SSH_KEY_BASE64
 script:
 - wget https://raw.githubusercontent.com/spack/spackinfrastructure/refs/heads/main/images/gh-gl-sync/SpackCIBridge.py
 - wget https://raw.githubusercontent.com/spack/spackinfrastructure/refs/heads/main/images/gh-gl-sync/requirements.txt
 - pip3 install -r requirements.txt
 - pip3 install requests==2.32.2
 - python3 ./SpackCIBridge.py "trilinos/Trilinos"
"ssh://git@ssh.gitlab.spack.io/jhsharp/trilinos"
"https://gitlab.spack.io" "jhsharp/trilinos
Using Tags
A tag in GitLab CI/CD is a label that you can assign to a runner, allowing you to control which specific runners can execute a given job based on the tags assigned to them. These tags are typically brief and descriptive; for example, if the runner is hosted on ROCm hardware, the tag might be amd or rocm.
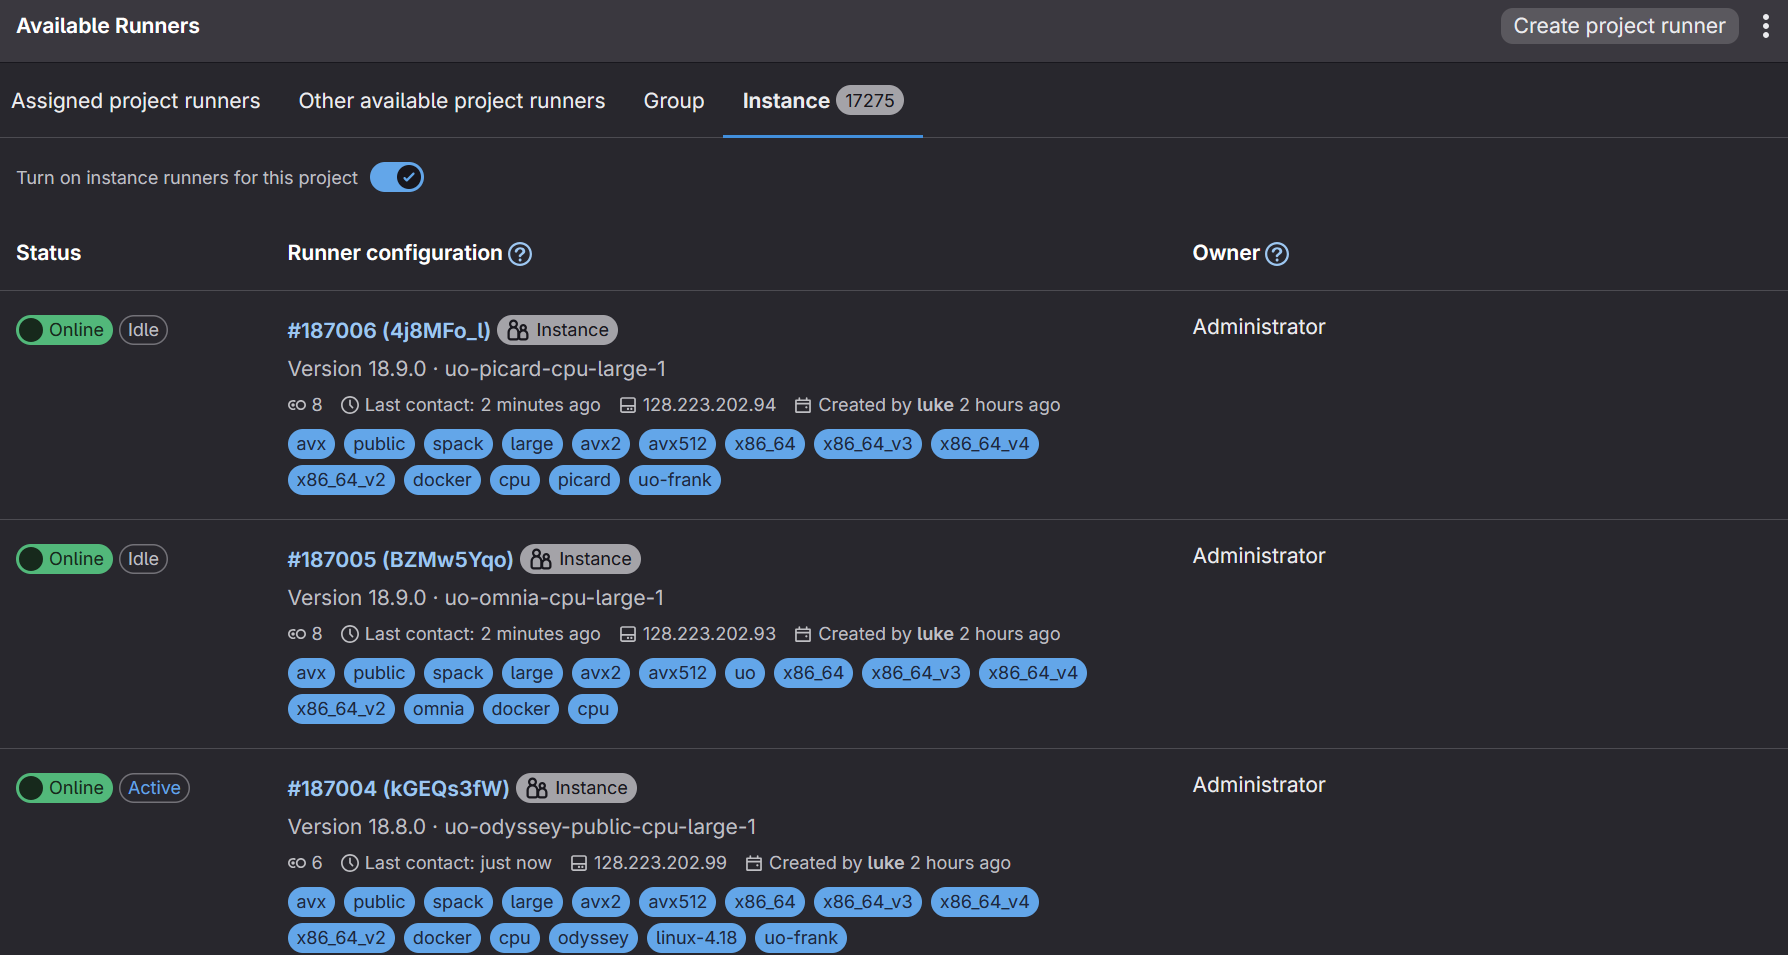
In the subsequent stages where you specify your jobs, you can add a GitLab runner tag (or tags). This allows you to control which runners can pick up the job. Refer to the tags section in the image below.
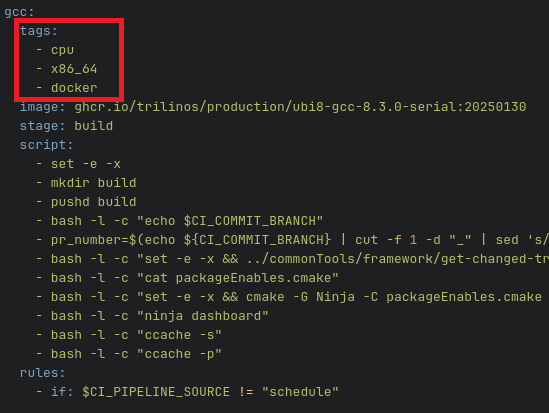
If you are using gitlab.spack.io, you should have access to a number of instance runners already setup for use by the University of Oregon. Feel free to scroll through them and find ones that work for your setup. They are located in Settings -> CI/CD -> Runners -> Instance. The tags associated with each runner are in blue, in the image below.
CI Job Scheduling
By default .gitlab-ci.yml will run automatically on a push or pull request / merge request. However, you can also create other use cases for your pipelines, such as running on a schedule or skipping in certain cases. See more complete documentation on CI/CD pipelines here: https://docs.gitlab.com/ci/pipelines/.
Spack CI Bridge Python Script
The SpackCIBridge.py script automates the synchronization, conveniently, of repositories between GitHub and GitLab in a CI/CD pipeline. This mirroring is crucial because it ensures that code changes are consistently reflected across both platforms, helping teams maintain a single source of truth. By automating this process, developers can focus more on coding and less on manual syncing, which boosts productivity and reduces the chances of errors during deployment.
Recall our command from the sync job:
python3 ./SpackCIBridge.py "trilinos/Trilinos"
"ssh://git@ssh.gitlab.spack.io/jhsharp/trilinos"
"https://gitlab.spack.io" "jhsharp/trilinos"
It can be generalized like so:
python3 ./SpackCIBridge.py <GitHub Repo> <GitLab SSH URL> <GitLab
Base URL> <GitLab Repo>
With the following arguments:
-
: This argument specifies the path to the repository on GitHub that you want to sync. -
: This is the destination URL for the GitLab repository where the code will be mirrored. It uses the SSH protocol for secure communication and points to the specific repository on the GitLab server where the code will be pushed. -
: This argument specifies the base URL of the GitLab instance. -
: This is the target repository path on GitLab where the code will be mirrored.
By including this in the sync job, we can mirror a GitHub repository to GitLab in our pipeline and then use it for tasks such as building and testing the software.
CI/CD Pipeline Overview
Viewing Pipeline Executions
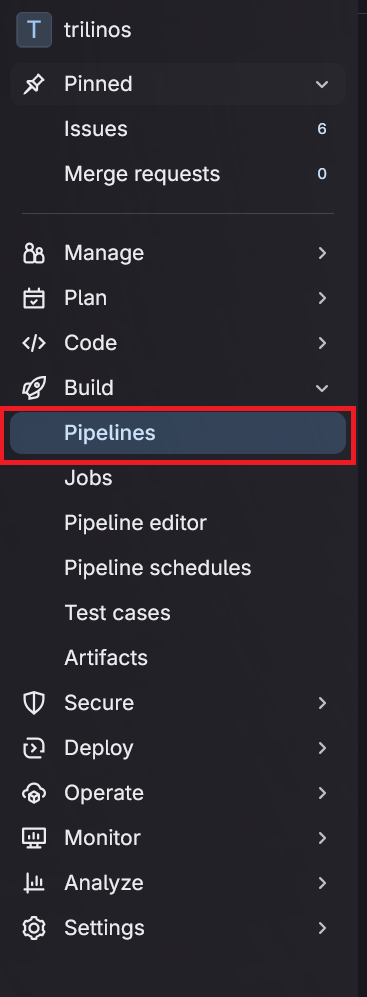
Once the CI/CD pipeline executes, you can click into Build -> pipelines on the left hand side of Gitlab.
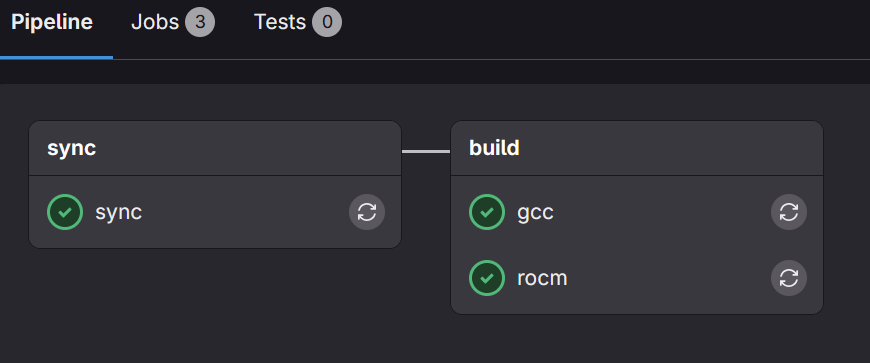
Below is an example of how the successful pipeline status may look:
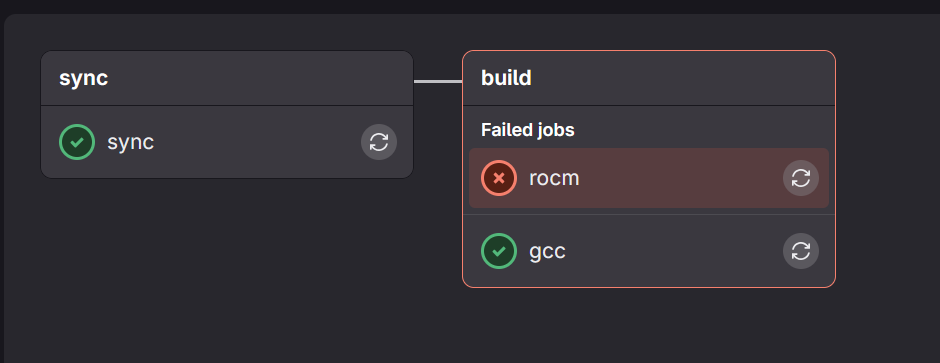
Investigating Failed Jobs
In the event of a job failure, you will see a red x rather than the green checks. To investigate, simply click on the job that failed. For instance, in the image below, click on rocm, this will open the console output window so that you can see errors.
Summary
Getting started with the Frank Cluster involves a series of steps, from contacting University of Oregon staff to setting up your SSH keys and configuring your CI/CD environment. By following the outlined procedures, you will be well-equipped to leverage the powerful computational resources available on the Frank Cluster, enabling you to enhance your research and development workflows. Should you encounter any challenges or have further questions, do not hesitate to reach out to the designated staff members for assistance.